Subscribe
TO OUR NEWSLETTER
Subsribe to our email newsletter today to receive product news and special offers!
Wall-hung sanitaryware is fast gaining in popularity and becoming the sanitaryware of choice for both the installer and end-user, and Geberit UK have become one of the best known suppliers for these units.
Wall-hung sanitary ware has long been the norm on the Continent but still has a long way to go in terms of bathroom domination in the UK. Only a couple of years ago it would have been difficult to get installers to contemplate switching from conventional freestanding sanitaryware to wall-hung through choice, largely due to the preconception that it was a headache to install.
Fast forward to the present day and almost the opposite is true with installers in many cases specifying wall-hung sanitaryware over and above the alternatives in order to achieve a quick, simple installation that would leave customers with the luxurious bathing environment they are looking for.
So why the change of opinion? Well, it’s largely due to the tools for fitting that are now at an installers’ disposal, chief among them being innovations such as the Geberit Duofix framing system, which makes installing a wall-hung WC, washbasin, bidet and urinal a quick and easy job.
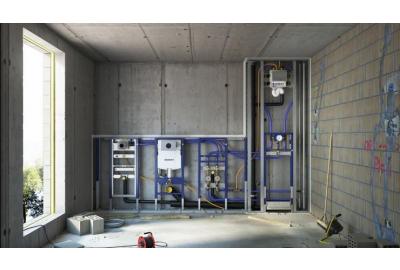
The Geberit Duofix Frame system allows you to design and create the bathroom of your dreams.
Hidden behind walls and tiles, Geberit Duofix supports wall-hung sanitaryware and includes an integral cistern.
The result is a clean and modern finish with no visible. The Geberit Duofix frame is the backbone to Geberit’s bathroom system. The sturdy metal frame has been designed to support wall-hung sanitaryware without the need for supporting walls. Geberit Frames can simply be bolted to the floor and placed within or attached to walls. The frame system can be used in the tightest of spaces including corners, allowing designers the freedom to create stunning bathrooms without compromise.
Here is a brief guide to the installation process for these units:
Step 1: For this particular installation we used the PreWall method which allows you to construct a duct in front of an existing wall to hide the plumbing and drainage. Firstly, measure and mark out the wall and floor, taking into account the finished floor levels. You can now drill the wall and floor fixing holes.
Step 2: The Geberit installation frame can now be adjusted to the correct fitting height, by loosening the feets’ locking bolts, placing your feet onto the floor brackets and lifting the frame to the desired height. Once you have the correct height, the legs are self supporting and will allow you to release the top of the frame and tighten the locking bolts.
Step 3: At this stage. the preWall brackets are fitted to the frame and rawl plugs are fitted into the relevant holes. The frame is then offered up to the wall and the wall and floor brackets are bolted up. The plastic packing piece can now be fitted to the wall bracket.
Step 4: The wall bracket is adjustable in and out to ensure that the installation is plumb. At this stage, final adiustments should be made to for level by slackening the lower frame locking bolts and moving the frame to ensure level installation. Once the level has been set you can adjust for plumbness by adjusting the PreWall bracket screw. Once you are happy that the frame is straight then the plastic locking nuts can be fitted.
Step 5: Now you can make the plumbing and drainage connections to the Geberit UP200 frame. The stud work and plasterboard can now be constructed and the tiling completed. Don’t forget to keep the housing lid on and fit yellow protection cups before tiling. Once tiling has been completed these need to be removed before installing the WC pan and flush plate.
Step 6. The final steps are to turn on the water supply via the integral isolating valve and set the flush volume, this is standard at 6/3 litres.
Step 7: You can now proceed with fitting the flush plate which in this case was the Artline model, however, all plates are fitted in the same way. You should pay careful attention to adiusting the push rods correctly to ensure correct flush operation.
Step 8: The work is complete and the Wall-hung WC is ready to use.


